Friday, March 30, 2012

Thank YOU!

As I was blog hopping the other day someone (I dont remember who it was now) had posted a Thank you post. She said she did it because it occurred to her that if you reply to a comment on your blog thanking them for stopping by, the only way they see it is if they come back to your blog and look at there comment.

So I wanted to say Thank you to everyone that visits, comments and/or just follows along. If it wasn't for all of you I probably wouldn't post as much, or care too much about this blog. You guys are the very things that keep me coming back and posting. I know I don't post as often as I would like too. I try my hardest. I know it will be a little bit easier once I am promoted at work and have  more of a set schedule.

You guys are all amazing I wanted to make sure that all of you know that! I try to follow along with everyone here and comment on all your wonderful items that you create but some days there is just not enough hours in the day! You all make AMAZING things and I am thankful that you all share your items with everyone!

This post is also special in itself and the reason I am choosing this post and not a post when I first saw the insperation to this post, is because this post is post number......


50
Thank you all for making this happen! I started this blog at the end of January and Never ever dreamed that in a little over two months I would have 50 posts, 130 comments, and let alone 19 followers. Every day all of these numbers grow. I can not explain the joy all your comments bring to me when I read them! 

When I started this blog, I had no idea what I was going to do with it, if it would even be popular, or if anyone at all would even read it. Starting off I figured I would only post a few times a month. Now if I go a day without posting something it drives me nuts! Who would have ever thought that this blog would make me happy and I would be able to share my knowledge with so many people! 

I really can't thank all of you enough! 


Until Next Time :) 


P.S. Dont forget ladies I will always be taking suggestions on tutorials so if you ever have any ideas at all please let me know. You can comment on any post, or the tutorials post HERE!

Thursday, March 29, 2012

Where did you go Mo-Jo?

Hey all. Sorry I have been MIA for a while. I have been swapped with work and really not sleeping good. It sucks to have to be to work at 3am and go to sleep at midnight. It starts to wear on you after a while.
Anyways I wanted to touch base with everyone and let you all know I am still alive. I just haven't had an motivation to scrap anything. I have tried shopping, I even cleaned off my very dirty scrapping desk.
Thats what normally helps me get my mojo back, because I always find something I want to work on. But cleaning last night didn't even really help.


 I created an item for a swap but that was it.

 Nothing really big at all.


 I haven't even really played with the Cuttlebug at all either. I ran a few embossing folders thru on Monday and inked them, but that is it.


I have high hopes for tonight though. I plugged in my Slice, so I can work on more items for the swap I am hosting. I am hoping to finish all those items today.

I am sorry that I missed Tutorial Tuesday this week, I had ever intention of making on and posting it. I was planning on doing everything on Monday my day off, but I just didn't have any scrappy mojo in me at all. It makes me even more depressed that I dont even want to scrapbook! That is the one thing that always makes me happy. No matter what I always have my scrapbooking, that thought always keeps me happy! This week it just wasn't enough. I dont know what it is. I am hoping that a little more shopping today can completely kick that feeling and I will have my Mojo back by the end of the night!

Hopefully I will have another project post for you tonight or tomorrow! :)


I wanted to ask you all what you do when you just dont feel like scrapping? How do you guys get back in the grove of things?

Until Next Time :)


Sunday, March 25, 2012

Sunday Savings

I went out again today, and found some amazing deals!


I started shopping for my R.A.K. Secret Sister Swap. Got some things on clearance so I have more to spend. I did some online orders I will have a full post on that swap, after my SS gets her package!

I found the TH embossing folders where on clearance along with the sanding block. The folders where 4.99 down from 10.99 and the sanding block was 3.99 down from 6.99! I was so excited I got the last one!

All the stickers where on clearance to .49 down from 2.99!!! I got Distress Ink on sale for 3.59 and then a 25% off total purchase! The Memento Dew Drops are regular 9.99 they were on sale for 30% off, and then also 25% off total purchase. My total at Js today came to 9.96! Less than the regular price of the Dew Drops.

I will be posting tomorrow my creations with my cuttlebug. Haven't even been able to play with it yet! But I have a great idea for a card with most of my new items.


Until Next Time :)


Saturday, March 24, 2012

Priceless

I decided to get the CuttleBug!!!! I got one tonight and got an amazing deal on it as well! I went in looking for the cuttlebug. Planning on paying $53.99. Little did I know that I would pay so much more less than that!

Upon getting to JoAnns I remembered that I had a 25% coupon to use. I pulled up the coupon on my phone, because out of the 5 coupons I have at my house, I forget every last one of them, go figure!!! Thank Gosh for my phone and the Js App. Anyways, I read all the fine print and the only Provo Craft mentioned on the coupon was Electric Machines and Cricut Carts.

I took my happy butt up with my CB display box and said I would like to buy the CB. They went and got one. It rang up at 89.99, I said I had the online price of 53.99 on my phone and showed the cashier my phone, she then adjusted the price. I then said I had a 25% off coupon, and she rang it up, well it didn't take anything off. I said something, she said the coupon doesn't work on Provo Craft. I then read the fine print as she was asking her manager. I stated that the CB was NOT an electric machine, nor a Cricut cart, so the coupon should work. The manager said "no" but the other cashier that was up front at the customer service register/desk said just to give it to me because it was not an electric machine. She then helped the cashier, figure out the price and helped her ring it up.

I am sure by now you all are wondering how much I paid for my CB. Well in the end I paid a whopping $40.49!!!!!  That was a 65% savings right there! What a great Kory Deal! I was so excited!!!


Cuttlebug normal= 89.99
CuttleBug Online Sale= 53.99
Reading Fine Print on Coupon= Priceless


I love when you find that lo-pole!!! To bad I had to work late today and was way behind on my plans for the day, so I didn't get to the store until later, and had some other shopping to do before I could go home and open my new toy! By the time we got home, it was time to start relaxing because I said I would work tomorrow as well. How stupid am I? hahahahah Work is going to go by so slow tomorrow because I have a new toy to play with at home!

I can't wait to start playing with this new toy and show all of you ladies my wonderful creations! I will post pictures tomorrow and maybe a project or two with it! We will see how work goes. Time for Bed now! hahaha


Until Next Time! ^_^


Thursday, March 22, 2012

Prize

A few days ago we hit our 100th comment, and Heather was our lucky winner. As promised I went through my stuff, did not find what I wanted to do, but these items are still great and who knows when I find the item I want to give out, Maybe that day I will have a RAK <3 You never know.

Anyways without further ado, This is what I gathered up for the lovely Heather.

She has her choice of color for the homemade Glimmer!


Hope you all enjoyed! I will have atleast one card done for you tomorrow. Maybe two depending on how long it takes for class.

Until Next Time :-)


Cuttlebug?

Js has the Cuttlebug on sale for 50.00 this week. I was wondering if I should get it as part of my spoiling? I was planning on buying about the same amount worth of supplies, I only have the texture boutique. I know its not ment for die cutting, and I have recently found the spellbinder dies. What do you all think?

Wednesday, March 21, 2012

Agenda For tomorrow!

Good Evening ladies:

I hope everyone had a great Wednesday!!! If not good news, its almost over, hahhaha. I just wanted to share with everyone what I have planned for tomorrow.

I am working on an Easter Card for a swap. I have another idea for a card from, an .svg file that I got from a friend.  I will also be going through my stash to find Heathers prize! I have an idea of what all the gift will contain I just have to remember where I put it all. I will be posting pictures of the cards and the prize.

I hope that everyone had a wonderful day, just think that the weekend is almost here! I will have a wonderful post on Saturday, I will be posting a day of spoiling, I will also be posting a picture so that you guys can put a face to the creations! I will be getting completely pampered on Saturday as a pre-celebration to being promoted! :) And to celebrate that I will be done with my class for work! :P

Also for those of you guys waiting for tutorials on how to make items, I will be posting Tutorial Tuesdays. You can look for your tutorials on Tuesday! I might make some for Thursdays on some weeks as well. Your next tutorial will be posted on Tuesday for you ladies!!!


Until Next Time! :)


Drum Roll Please...

We hit our 100th comment today!!!! I am still not sure what the prize will be as of right now but I am sure I will figure it out later tonight after dinner!


And the winner is......


Heather Lynn from Random Recipes, Paper Crafts, and Photos by HL!


Congrats Heather!

Let me know all your info and I will get your gift to you! :)

I really didn't think that we would hit it this soon! Thank you everyone for all your comments and support! I am sure that I will have another give away soon! I just need another Idea!

Until Next Time :)


Tuesday, March 20, 2012

Liebster Blog Award!!!


Today I received a wonderful item today! I want to say thank you Heather!

Thank you so much!!! You all should go check her out! 


 "Liebster" is German for "Dearest". The award is a  "Share the love arrangement", given to inspirational bloggers with less than 200 followers. Here is the to do list for any of the  "Liebster" blog award recipients. 

1. Thank your Liebster Blog award presenter on your blog.

2. Link back to the blogger who presented you the award.

3.Copy and paste the award on your blog.

4. Present the Liebster Blog Award to 5 bloggers with less than 200 followers.

5. Let them know they have been chosen by leaving a comment on their blog.

I am happy to now honor some fairly new bloggers with this award..


Please wear this award proudly at your blogs and be sure to follow the instructions above to keep it circulating..


My Five wonderful ladies for this award are:

1) Pebbles at Ms Pebbles Magic Fingers
2) Ursula at Under Scarlet Bird Wing
3)  Alissa at Will Run For Stamps
4) Mandi at Scrapping Mandi
5) Norma at Lil Honey Bee Studios

Hope you all enjoy it as much as I did! 

Until Next Time :) 


Monday, March 19, 2012

Taking Requests!

Hello all!

When you see this it will be morning but right now, its almost bed time hahah. I will be in class most of the day tomorrow so I am typing my post early so I won't have to worry about it, I can just focus on my managers class! I am almost a manager at work now! YAY me! Maybe that means I can stop working Crazy hours! And slow down a bit! HA yea right! Anyways back on topic here!

I was wondering if there is anything you guys would like me to do a tutorial on. Anything you have wanted to try but never had the time to figure out how to do. Anything like that!
I have already had a request for my Tye-Dye paper, which I will be posting in the next week or so. I will try to figure out just about anything that you ladies would like to learn how to do! Just let me know!

Have a wonderful day!
Until Next Time :-)


Sunday, March 18, 2012

Regular Glimmer Mists

I told you guys yesterday that I would let you know how I make all my regular glimmer mists.


What you will need:


A Spray Bottle
Water
Peralizing Medium
Any color Waterbased Acrylic Paint


Step One:

Fill your bottle about 3/4 of the way up. You will learn as you go how much you will really need. I started out with less, but I found this is the right amount to get the color that I wanted to achieve.


Step Two:
       Add the Pearlizing Medium to your water. You only need a small amount. It all depends on how much Shimmer you want it to have; if you want less you add less and if more you add more.
After you add the shimmer, I shake it up. (This is also optional.) (This is about Three (3) drops of the medium)


Step Three:
       Add your acrylic paint. You add as much or as little as you want your color to show up. And then you shake it up.


Step Four:  Spray a sample sheet to make sure it is the color you want it to be. If you make it too dark then you can just pour some out and then add more water. To darken the color just add more paint. If it does not have enough glimmer for your taste then you just add more of the peralizing medium.

Sorry you can't really see the shimmer in this picture but you can see the color!

Very Important:
** You have to make sure that you shake your spray bottle before EVERY use. The glimmer settles at the bottom. As shown here:
This is basically the same process as the Tim Glimmers that I make. It is still a lot simpler and cheaper than some of the tutorials out there. I hope this post helps you ladies out! Let me know if you have any questions!  Yes I used some of the same pictures, because some of the steps are the same.


Until Next Time =)


Saturday, March 17, 2012

I Made Tim Glimmer!

Good Evening everyone.

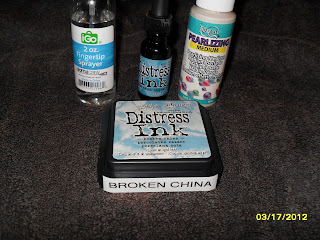
As I promised here is the awaited post! I have been wanting to do this for a while and just never really had the time or energy to make sure it worked right, until now! And best of all it's relatively cheap. Cheaper than buying Glimmer mists themselves. And this method is cheaper than using Perfect Pearls.

Here is what you will need:

Tim Holtz ReInker (any color, I used Broken China)
Small Spray Bottle (any size)
Water
Pearlizing Medium
Tim Holtz matching Ink Pad (optional)


Step One:


       Fill your bottle about 3/4 of the way up. You will learn as you go how much you will really need. I started out with less, but I found this is the right amount to get the color that I wanted to achieve. 


Step Two:


       Add the Pearlizing Medium to your water. You only need a small amount. It all depends on how much Shimmer you want it to have; if you want less you add less and if more you add more.
After you add the shimmer, I shake it up. (This is also optional.) (This is about Three (3) drops of the medium)


Step Three:

       Add your ReInker. At first I added about Ten (10) drops. (after I did my first sample shown below, I decided that it wasn't as dark as I wanted it to be so I added Ten (10) more drops.) Again, this is all to your preference; Depending on how dark or light you want your color to be.


Step Four:


      For the Tim Glimmers I use it with the Distress Ink pad, as seen in the same picture here. When I test out the the spray to make sure its the color I want, I inked part of my sample paper to see what it would look like. You do not have to do this at all. You can just use it on plain paper if you would like.


Step Five:


     Spray a sample sheet to make sure it is the color you want it to be. If you make it too dark then you can just pour some out and then add more water. To darken the color just add more drops of the ReInker. If it does not have enough glimmer for your taste then you just add more of the peralizing medium.  (This one (>) is my first test and that is when I found out that I wanted more ink for the color to show up more on white paper.)


Very Important:

** You have to make sure that you shake your spray bottle before EVERY use. The glimmer settles at the bottom. As shown here:


There you guys have it! I hope you enjoyed it and that it was helpful. If you have any questions let me know and I will be happy to answer them. I will be updating tomorrow with how to make normal glimmer mists.

Until Next Time ^_^


Thursday, March 15, 2012

Prizes, Prizes, Prizes

I have figured out what I am going to give out my first prize for!!! I don't know what it will be yet, but I will know it when I see it.


Anyways my first prize will be for my 100th comment on my posts. :) I wont tell you what number we are at now, but I will tell you it might be a week maybe I dont quite know. But rest assured that it will be an awesome prize! :) I will let you know as soon as we hit that 100th comment! I cant wait to hit it and see who gets it!

Let me know what you guys might like for a prize!

Until Next Time ;)


Wednesday, March 14, 2012

JoAnns Shopping Binge Day 2

After reading a blog post by my new scrappy friend Heather Lynn about her findings at another local JoAnns that I have never been too. I decided that I wanted what she got and set out to go check out this "other JoAnns" I did have good intentions of still not spending that much and just glancing around too see what this one was like. I sadly did not find what I went in for, but thats ok it was something that I really did not need. It was just a matter of it being so cheap!

 I did find more spellbinders though. I got Labels Six which you have all seen my use already! Labels Two and Classic Scalloped Rectangles Small. There is a few more that I do want to get, just not sure when I will be able to get them. After not finding what I wanted and looking around I decided I wanted a new stamp for a Card Swap which you have already seen. lol I then found the stamp which led to the cards which where on sale and the paper. I then thought about the shirts that I wanted to make, so I ventured over to the Iron Ons and glanced around I have had yet to find anything that fits my fancy for my shirt, well that was a different story on this day! I found the perfect items! Which you can see in the pic and if not you will see in a future project.

I used my 50% off coupon for my stamp and my 40% off coupon for the iron on letters. I also picked up something extra special, I found some embossing folders on a clearance rack for 5.97, well this is where the bad customer service comes in.


I took all my pretty little items to the check out. When the embossing folders rang up at 19.99 I said "I think those are on clearance for 5.97." The cashier got an attitude very quickly and said "I Don't Think SO... But I will check" And then stormed off. A few minute later she came back up and said "They aren't on clearance and that nothing of the cuttlebug was clearanced." Again with the same bad attitude. I said ok then I dont want them. I paid for the rest of my items and walked to my car very unhappy with my service and decided that I wasn't going to stand for it today! I put my stuff in the car and walked back in to double check and make sure that I wasn't seeing things and that they didn't move the items from the signed hook! I was right, I walked to the front and ask to see the manager at the item.

I then told the manager that I was the customer who they were looking for this item, I showed him where it was and the sign, I said that if it wasn't clearanced that it was fine I didn't wanted I just wanted someone to know about the error and that I wasn't happy with the bad attitude and being told I was wrong from the start! He said he was sorry double checked the numbers and then gave me the item for the "clearance" price because it was signed wrong. Any other day if I would have received nice service I would not have gone back and complained and proved I was right. If she would have even just said "No, I'm sorry this item is not on clearance." I would have been happy and not worried about it.


This is the post that started it all for day two! hahah I was perfectly happy with my Day One purchases. heheheh Its all your fault! J/K"GoodWheel"

Until Next Time :)


JoAnns Shopping Binge Day 1

So after working everything out and the spending FREEZE being lifted I went on a shopping two day shopping Binge to JoAnns!

I went to the local one first and found some good stuff on Clearance and I also had a 40% and 50% off coupon to use as well. I went against my better judgement and bought a Spellbinder!!!! My very first one, I got the Large Octagon ones!! They were only 5.97! I also used my 40% coupon to get some more pearllizing medium I am stocking up on it when I have coupons that I dont have something that I really want or am getting only sale items. I used my 50% coupon on Goosebumps Spray... But whats that you say I already have Goosebumps? Well yes I do but this one is different this one is SHIMMER!!!! I was so excited when I found it! I love anything shiny! I can't wait to use it!

That was all Day 1 Deals! Stay tuned for Day 2 Deals and Bad customer service!


Until Next Time! ^_^

Tuesday, March 13, 2012

Friend Card

After my shopping trip to JoAnns today, I came home to make a Friend Card for a swap I am in on SB.com. I had wanted a new stamp to make this card with, I found one while at JoAnns. I will also be using one of my new spell binders.


For this Card I used:
JoAnn Craft Essentials White Embossing Powder
Inkadinkado Friend Stamp
The Paper Company Chocolate Texture Cards
VersaMark Embossing pad
Paper Pizazz Pink Flourishes
Maroonish Cardstock
Spellbinders Nestabilities Labels Six
Texture Boutique ( I know its not a die cutter but it works)

First I took the biggest Spellbinder and cut out my center piece in the Maroon Cardstock for my card with my Texture Boutique. ( Yes I do know that its not a die cutter, but as long as you don't mind the black insert getting cut you can use it. I use an embossing folder under the white piece, for a filler. If you don't have a filler it wont be thick enough to cut your paper.)


I then took my Friends stamp and inked it with my VersaMark pad and stamped the middle of cut out. I took my white embossing powder and embossed the saying. 


I took the Pink Flourish paper and cut a portion down so it would be a little bit smaller that my Chocolate card and would make a brown border.
 I glued it to the card


Lastly I glued the center die cut to the middle of the card and then you are finished. This is a fairly simple and fast card!! :) 


Make sure that you stay tuned to see all my JoAnns findings this week! 
Until Next Time =]


Monday, March 12, 2012

Newest Addition to the Family

After Saturdays horrible day I was able to talk my BF into lifting the spending FREEZE!! For the night to use a coupon that expired that day! I was so excited. Sad that it took those events to cause the lift, but I was able to get some much needed Scrappy Shopping therapy.  :)


I was able to use my 30% off coupon to Archivers, and get some Distress Markers to add to my collection!! :) The BF got me on with a coupon and then I bought one, I only had to pay full price for one of the markers! Isn't that a great deal?

I also got two new glitter markers/pens! I love these, but I do not go to Archivers hardly at all so I dont get to get them that often! I was so excited to get a few new ones.

I was also so excited to the e-mail saying that they had the Distress Markers. I knew I had to get them, but I got the e-mail after the announcement that I was on a spending FREEZE. I was so sad knowing that I would have to wait.

If I had to choose between getting the markers and all the drama that happened Saturday that lead up to the O.K. to get the markers, I would have just stayed on the spending freeze. I wouldn't trade anything in the world for the stress that happened that day!


Until Next Time.

:)


Sunday, March 11, 2012

Just for Fun!


My friend Kory had posted about a new stamp he had bought and said that he was "too lazy" to think of an idea on how to use it. I think at that point he was just too "drunk" to think straight hahaha. The first word of the post title was Wine.

Anyways so at first I did not have an idea for the stamp but after a little bit I had decided that I knew how I would use the stamp. Heres how:

I cut out three Circles, put them in the middle of the card front.
I placed the "Stamp in the middle" In this case it was just the picture
of the stamp that I would have used. I took my Milled Lavender
Distress Ink and Inked the edges.


I then took my Broken China Distress Maker and wrote on the Inside of the card "Thank You" and then to follow pattern, I just the Lavender Ink around the thank you.


**Now mind you that if I would have had the stamp and was making the card for someone it would be a lot better this is really just a physical sketch.**


Here is the post that this is a reply too, let him know your ideas for a chance to win a a Kory Prize!!!!


Until Next Time.   :)


Edit: I changed the title,I realized that it made it look like I was giving a way a prize. Not yet but I was thinking about it so maybe in the near future!

Friday, March 9, 2012

The lovely Mr. Holtz

***Flashback to 2005***

I was new to scrapbooking. I only just glanced at Tim Holtz items. Truth be told they always intimidated me. I never knew how I would ever use any of his stuff, it was also not my style. Until a few months ago I never even knew really what his distress ink was!! Little did I know how much that had saved me! hahah

***Present Day***

Looking back I was glad that I did not know what that I know now. I also never even realized that I have and TH items all a long. When I first got into embossing, I was always on the look out for new powders. One day will browsing HL I found a bunch on Clearance. Looking at them the other day I realized that they are TH distress embossing powders!!!! I have had his items for years and never even realized it. Now my collection keeps growing and growing I have newly discovers the distress inks and stickles. I have yet to use the stickles, but I am sure that I will in the near future. 

So looking at how my collection had started and what it is today, a lot has changed in my views on scrapbooking. I can see the change in my styles over the years and my tastes. I know that I will always be changing. Its just cool that you can see yourself grow and change in the style of your layouts. I never noticed mine until about last year when I had to go through all my scrapbooks that I had made. I have learned a lot and have really learned a whole lot more thanks to SB.com! 

Okay now that I think that I am way off topic ahahah. 

Here is what I found out my collection to have started this "horrible" "new" addicition! hahah 

Just embossing powders that I didnt even know started it:


Then it grew to just adding stickles, 


then I added distress inks, little did I know that all my items went together I have most of all the collection items. hahahah 

I also have added some embossing folders and some wonderful tools! So here is my whole TH collection!!!


And my new addiction is driving me crazy, because now I feel incomplete since I have some powders and not the stickles and inks to go with them and its driving me crazy! 


And now I am on a spending freeze for the month! UGH 


Until Next Time ;)